
You can now select and search your tracks with PrB.
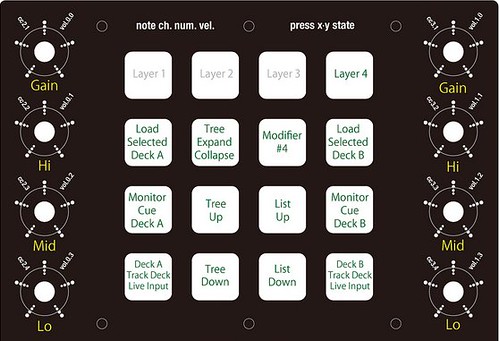
Let's go in to Layer 4 by hitting Layer 4 button on top right corner and make sure LED light
is turned on then please go and see our YouTube videos for following instructions.
1. Selecting a track.
2. Loading a track.
when loading a track to Deck A. Hit a pad for [Load selected Deck A].
3. Switching Monitor ON/OFF.
4. Switching Deck setting.
when changing Deck A setting. Hit a pad for [Deck A track/Live input].
5. Gain, EQ (Hi, Mid and Low.) setting.
Basically, Layer 4 works as a main control panel for your DJ set.
Next post is about Layer 3. Stay tuned!
Last 5 posts in Controller
- <!--:ja-->Chalkboard Electronicsのタッチスクリーンの輝度を強制的に最大値にする<!--:--><!--:en-->How to raise the brightness to max value of Chalkboard Electronics Touch Screen<!--:-->
- <!--:ja-->Banana Piでタッチスクリーンを使う<!--:--><!--:en-->How to use a touchscreen on Banana Pi<!--:-->
- <!--:ja-->Banana Piでのカーネル再構築<!--:--><!--:en-->Re-compile of Kernel on Banana Pi<!--:-->
- <!--:ja-->Banana Piで解像度1366x768のモニタを使う場合<!--:--><!--:en-->How to use the screen resolution 1366x768<!--:-->
- <!--:ja-->Banana Pi(Bananian)へのPd-extendedのインストール<!--:--><!--:en-->How to install Pd-extended to Bananian on Banana Pi<!--:-->
[…] up PrB Fader Adjustment MIDI mapping file for PrB PrB MIDI mapping assign – Introduction – PrB MIDI mapping assign – Selecting and Loading Tracks – PrB MIDI mapping assign – Playing and Syncing tracks – PrB MIDI mapping assign – 8 […]